

Building a vintage dual caliper Hurst Airheart brake unit – by Jeff Campbell
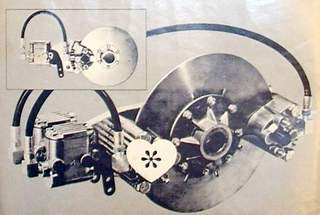
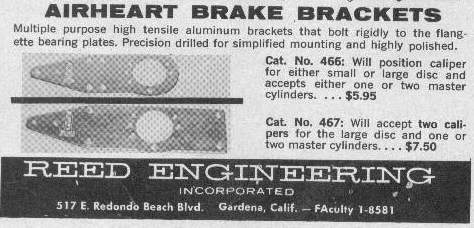
After doing a little research in my “Vintage Karting Library”, I found several advertisements in early to mid 1960’s magazines for the H/A brake units and brackets, they sold a single and dual caliper unit. FYI – no, H/A does not have any NOS brackets lying around (I already contacted them!). Luckily all the H/A brake 150 series brake components are still made today, we just need to fabricate a bracket.
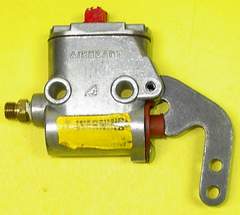 Find “down lever” master cylinder, or buy the “down lever” (p/n AH3115-1021) and install on a readily available “up lever” unit (that is what I did). I purchased down-levers from Hurst Airheart http://www.airheart-brakes.com, 763-478-8000, you will have to call them to order the down levers.


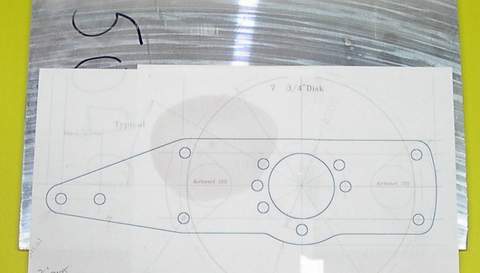 Print out the bracket file (download one of the Acrobat pdf files below, which, and “print to scale” as a template) if you have software to print DXF files, use the printout as a template, as I have. Using rubber adhesive, glue template to plate stock. Notice that the master cylinder mounting holes are dropped 1/2″ below the center line of the plate, all indications I have are that these holes were right on the centerline in the original H/A design. The 1/2″ drop allows for better alignment of the brake pedal rod on karts where a drum brake unit is being replaced by this H/A unit.
Airheart_Reed_single_caliper_print_template
Airheart_Reed_dual_caliper_print_template_one_sheet
Airheart Reed dual caliper print template – 2 standard pages
Airheart_gem_1851_dual_print_template
 My first instinct starting this project was to have the bracket milled out on a milling machine. Then I thought hey, why not try doing this using some common shop tools, my “made in China” bandsaw and drill press.
 Now, time to drill some holes, plan is to start with a small bit and work on up. OK, what is that burning smell? Looks like the motor capacitor on my $39 China drill press just got cooked…..looks like I’ll be taking a break here….. more later!
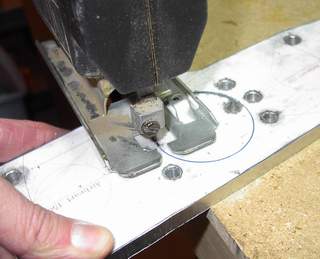 “Borrowed” a capacitor off another “made in China” power tool motor and finished drilling those holes. Caliper mounting holes were sized at 0.375″ (3/8″) and all other holes were drilled to 0.313″ (5/16″). Positioning the holes accurately is very important, use a little finess on the drill press to perfectly center each hole to the pattern. Take a big drill bit 1/2″ or larger, hit each end of each hole to put a nice break on each hole entry. Next drill an entry hole and jigsaw out the big center axle clearance hole. (yea, I know, you guys with milling machines are shaking your heads)
 Peel off the template, still a lot of hand finish work to be done on all the saw cut edges, more on that later.
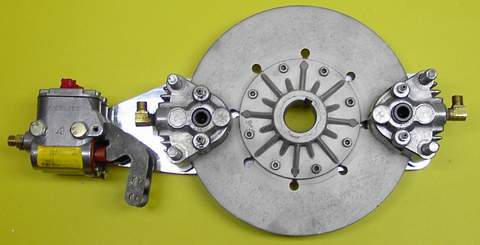 Before investing any more time in finishing the bracket, make sure all the parts mount correctly, slip some bolts through and have a look, this one came out perfect!
 After spending about an hour working with a hand file, wheel grinder and 100 grit sandpaper, the cut edges finished up rather nicely (Note: using the side of a grinding wheel to grind long flat edges is dangerous, but so is driving a kart!). In the above photo is a nice quality low priced model CF4 1/4″ heim joint I purchased online from Stock Car Products this will be used for attaching the kart brake rod to the master cylinders. Now, for my old 1961 Fox kart, I have to build a 1″ thick spacer plate, about 5 1/2″ x 2 1/2″, to move the brake unit out far enough to clear the left hand engine mount and left hand engine fan shroud. Also, I will be making a new shorter stainless steel 1/4″ brake rod, the existing one could be cut off, but I want to preserve it.
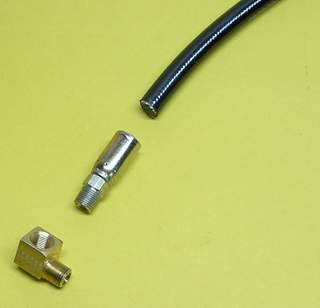 Took a trip to local NAPA store, they build custom hydraulic hoses. I looked for fittings and hose that looked like the original Hurst Airheart advertisement.The guy working there wanted me to buy the latest stainless steel teflon lined hose with fancy couplings. I told him, “no, I want to buy that junky old black hose and use 1/8 NPT fittings.” I think the hose I picked was a little larger in diameter than was originally used, but was all they had at NAPA. I bought 3 1/2 feet of hose and the loose fittings, then headed back home.
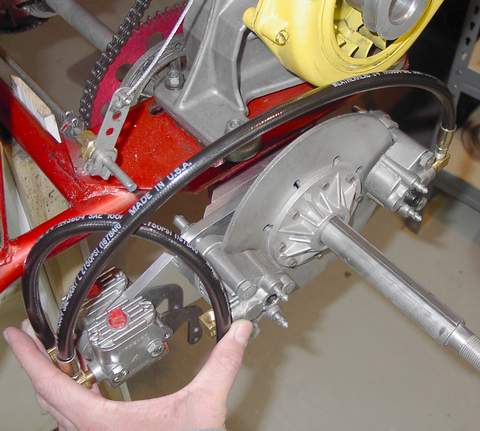 So, the idea is to mount the brake on the kart, then test fit the hoses, cutting the hose to the desired length. Now, it’s time to head back to NAPA and have the hose fittings crimped on with their hydraulic crimper. Also, need my 4 foot long 1/4″ stainless steel rod to show up, for making a new brake rod. The spacer plates I made can bee seen in above photo, between brake bracket and kart bearing hanger, the spacers total 1 inch thick, and move the brake disk out to clear the motor mounting plate on my 1961 Fox Kart..

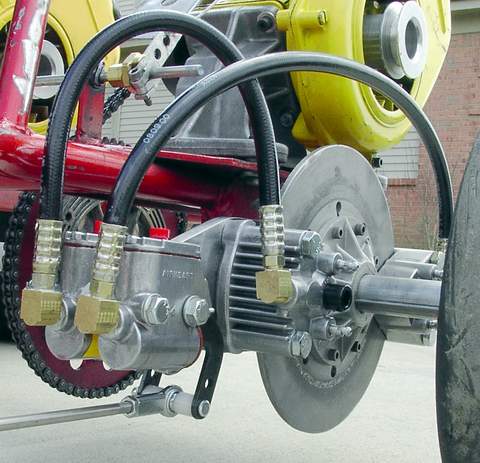 Had NAPA crimp my hoses. I picked up some nylon spacers and a clevis pin at local hardware store and used them to attach the heim joint to the master cylinder down levers. For the 3/16″ thick brake disk I used, I did have to install shims in the calipers, which I just made myself from 0060″ aluminum stock, I put a pair of shims in each caliper to accomodate those new pucks. One fine point to pay attention to, these calipers mount on the anvil castings of the caliper, it might require some machining to make that anvil mount surface parallel to the puck surfaces; also, the two anvil castings must be matched in height, take this all into account when machining/surfacing the anvils. For my anvils, I used a surface plate and sand paper to match them up, took a little time and checking, but worked fine. After bleeding the brake systems, I headed out to the East Lansing kart track (Lansing, MI). Fired up the dual MC20’s, took her out on the track, after a few careful laps, I then leaned out the motors and put my foot into, going way deep into the turns, the brake was AWESOME, great stopping power
Safety Notice: Safety wire/pin all fasterners, the master cylinder lever roll pin, and the brake rod clevis pin. There will be a future article on drilling fasteners for cotter pins, and other safety wiring ideas.
 Make your own brake brackets
Click links below to download Acrobat bracket dimensioned drawings dual caliper or single caliper , GEM G1851 dual caliper. 
Airheart Single Bracket style dimensioned drawing
Airheart Dual Bracket style dimensioned drawing
GEM-G1851 style bracket dimensioned drawing
 Disclaimer: These projects are suggestions and/or educational information. Use any of the ideas, comments, drawings, photos and information on this page at your own risk. Follow your power tool manufacturer’s safety guidelines also. Karting is a fun sport, but not without inherent danger, make sure you play responsibly and safe
If you enjoyed this article, please consider sharing it!

